Chocolate Lava Cake
There’s something truly magical about desserts that feel both simple and unforgettable. When I think of special moments at home, I always picture soft lighting, a calm atmosphere, and something warm baking in the oven. That’s exactly where my favourite chocolate lava cake comes in. It’s rich, indulgent, and creates that perfect “wow” moment without requiring hours in the kitchen.
For me, chocolate lava cake isn’t just a dessert it’s an experience. The anticipation while it bakes, the aroma of melted chocolate filling the kitchen, and then that satisfying moment when you cut into it and the warm, gooey center flows out. It instantly makes any evening feel more special, whether it’s a romantic dinner, a celebration, or just a quiet night when you want to treat yourself.
What I love most is how effortlessly elegant it feels. Even though it looks like something straight out of a fine dining restaurant, it’s surprisingly easy to make at home. And once you get the technique right, it becomes one of those recipes you’ll keep coming back to again and again.
Why This Chocolate Lava Cake Always Works
Over time, I’ve tried different versions of chocolate lava cake, but this one is the most reliable and rewarding. It strikes the perfect balance between a soft outer cake and a rich molten center.The beauty of this recipe lies in its simplicity. You don’t need complicated ingredients or professional baking skills. Instead, it’s all about understanding a few key steps and trusting the process.
What makes this recipe stand out:
- It uses basic pantry ingredients
- It comes together in under 30 minutes
- It delivers consistent results every time
- It feels luxurious without being complicated
- And honestly, once you serve it, people rarely believe you made it yourself.
Ingredients You’ll Need
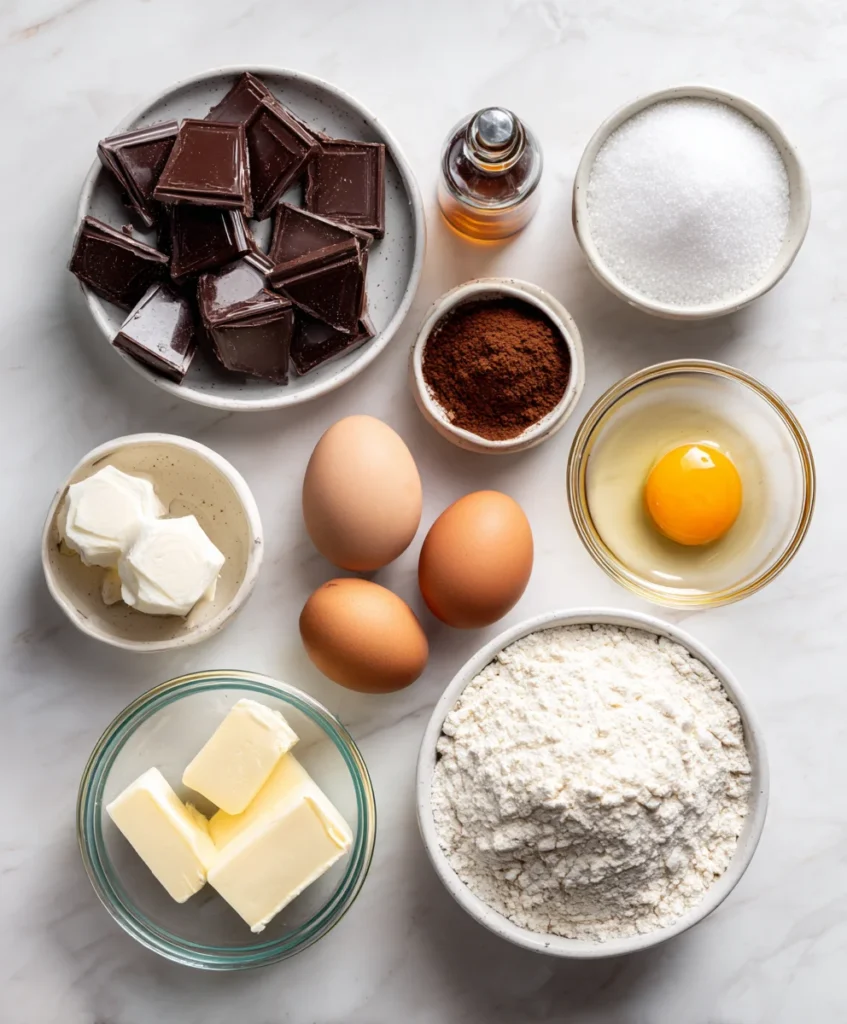
Whenever I make chocolate lava cake, I focus on quality over quantity. Since chocolate is the star ingredient, using a good one makes all the difference.
- 100g dark chocolate (60 70% cocoa for best flavour)
- 100g unsalted butter
- 2 whole eggs
- 2 egg yolks
- 1/4 cup (50g) granulated sugar
- 2 tablespoons all purpose flour
- 1 teaspoon vanilla extract
- A pinch of salt
- Butter and cocoa powder (for greasing ramekins)
Each ingredient plays an important role. The eggs give structure, the butter adds richness, and the flour provides just enough stability without making the cake dense.
Step by Step Method (My Personal Approach)
1. Preparing the Ramekins Properly
I always start by preheating my oven to 200°C (390°F). Then I take a moment to properly prepare the ramekins. This step might seem small, but it makes a big difference.
I generously grease each ramekin with butter, making sure to cover every corner. Then I dust them lightly with cocoa powder instead of flour. This not only prevents sticking but also keeps the chocolate flavor rich and uninterrupted.
2. Melting Chocolate and Butter
Next, I melt the chocolate and butter together. I usually do this using a microwave in short intervals, stirring in between until smooth.The texture should be glossy and silky. I always make sure not to overheat it, because burnt chocolate can ruin the entire flavour.
3. Whisking Eggs and Sugar
In a separate bowl, I whisk the eggs, egg yolks, and sugar together. I don’t rush this step. I whisk until the mixture becomes slightly pale and thick.This helps create that soft, delicate texture in the cake. It’s one of those small details that really improves the final result.
4. Bringing Everything Together
Now comes my favourite part combining everything.I slowly pour the melted chocolate mixture into the egg mixture while gently whisking. Then I add vanilla extract and a pinch of salt.Finally, I fold in the flour. I always mix just until combined. Overmixing at this stage can make the cake dense instead of soft.
5. Filling and Resting
I divide the batter evenly into the prepared ramekins, filling them about three-quarters full.Sometimes, if I’m preparing for guests, I let the filled ramekins rest in the fridge for a few minutes. This helps control the baking process and gives me more consistent results.
6. Baking with Precision
This is where everything comes together or falls apart if not done carefully.I bake the cakes for 10 to 12 minutes. The edges should look firm, but the center should still be soft.Every oven is slightly different, so the first time you try this recipe, keep a close eye on it. That perfect molten center depends entirely on timing.
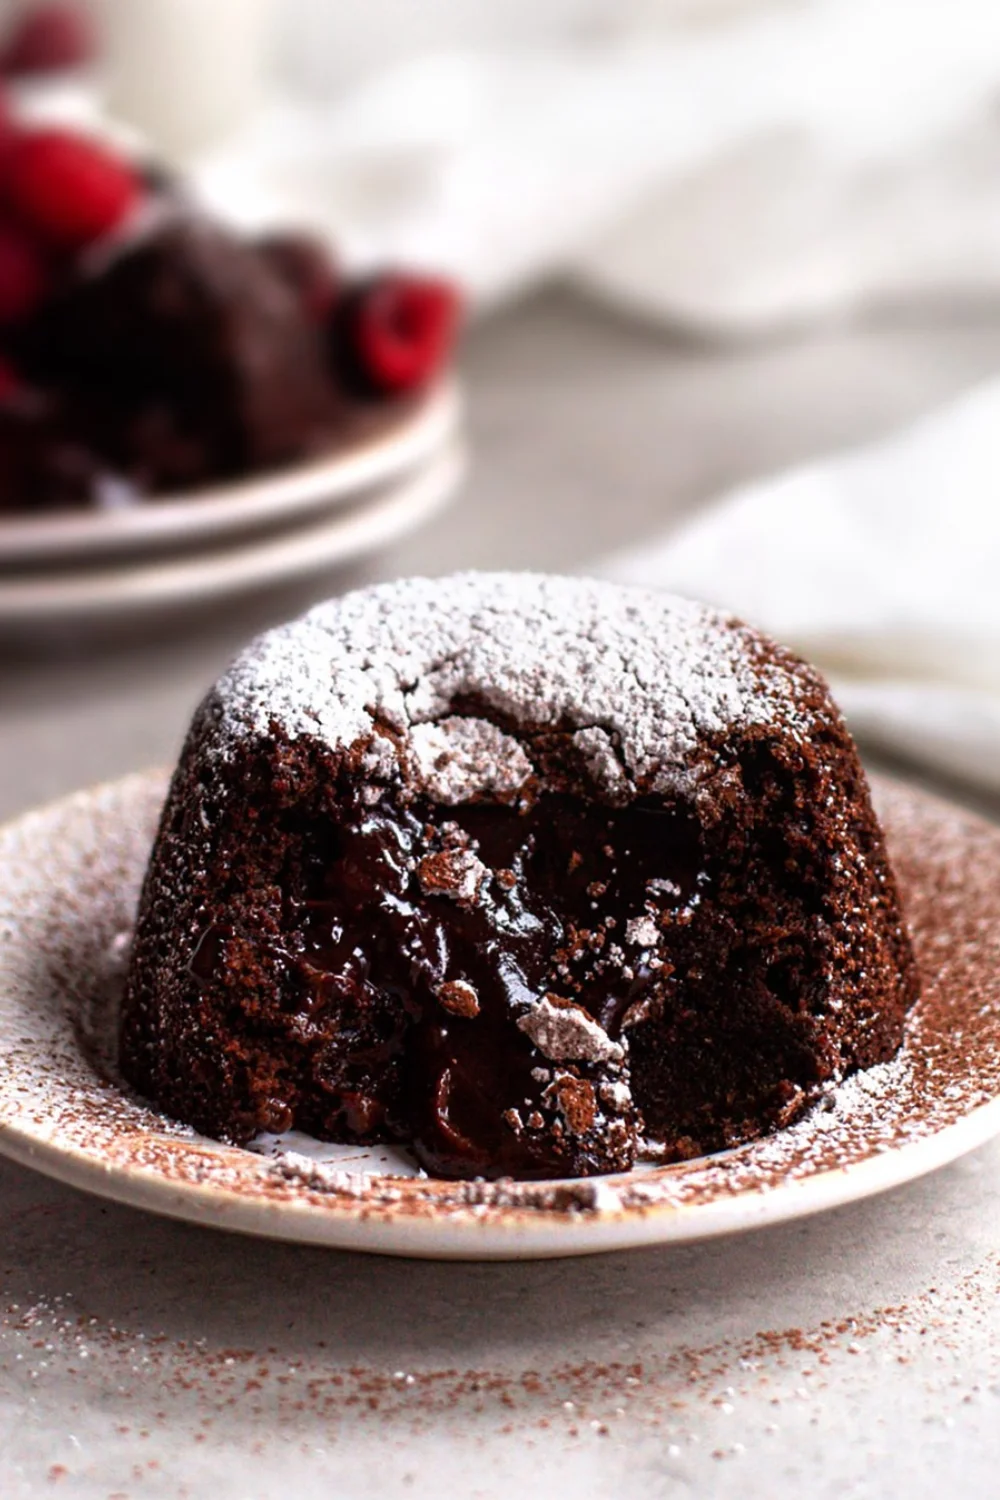
7. The Final Reveal
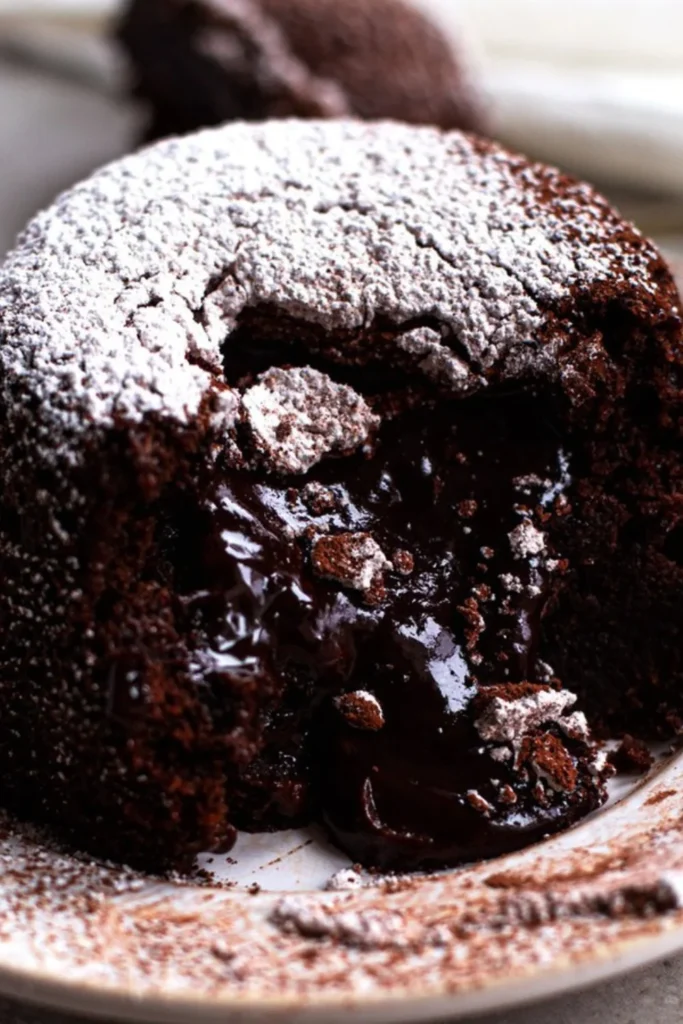
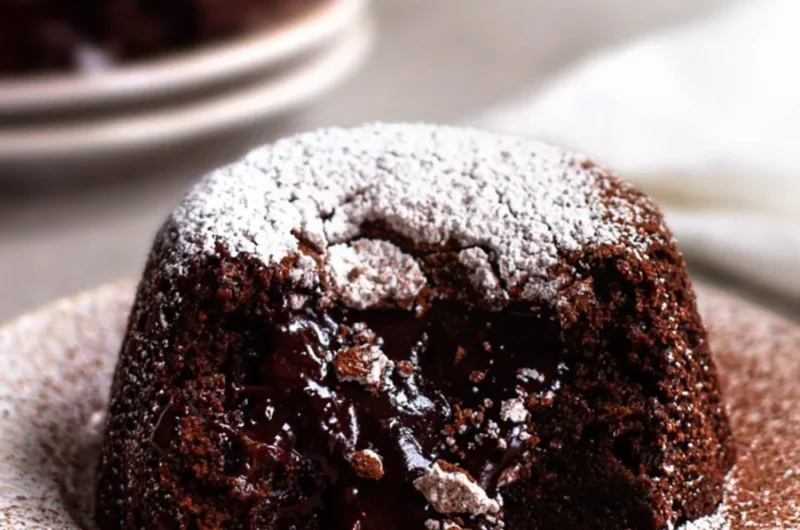
Once out of the oven, I let the cakes sit for about one minute. Then I gently run a knife around the edges and invert them onto a plate.And this is the moment I always look forward to cutting into the cake and watching that rich, molten chocolate center flow out.It never gets old.
My Top 3 Tips for Perfect Results
1. Timing Is Everything
Even one extra minute in the oven can take away that molten center. Always check early rather than late.
2. Choose Quality Chocolate
The better the chocolate, the richer and deeper the flavor. This is not the place to compromise.
3. Don’t Overmix the Batter
Mixing too much can make the cake dense. Keep it light and gentle for the best texture.
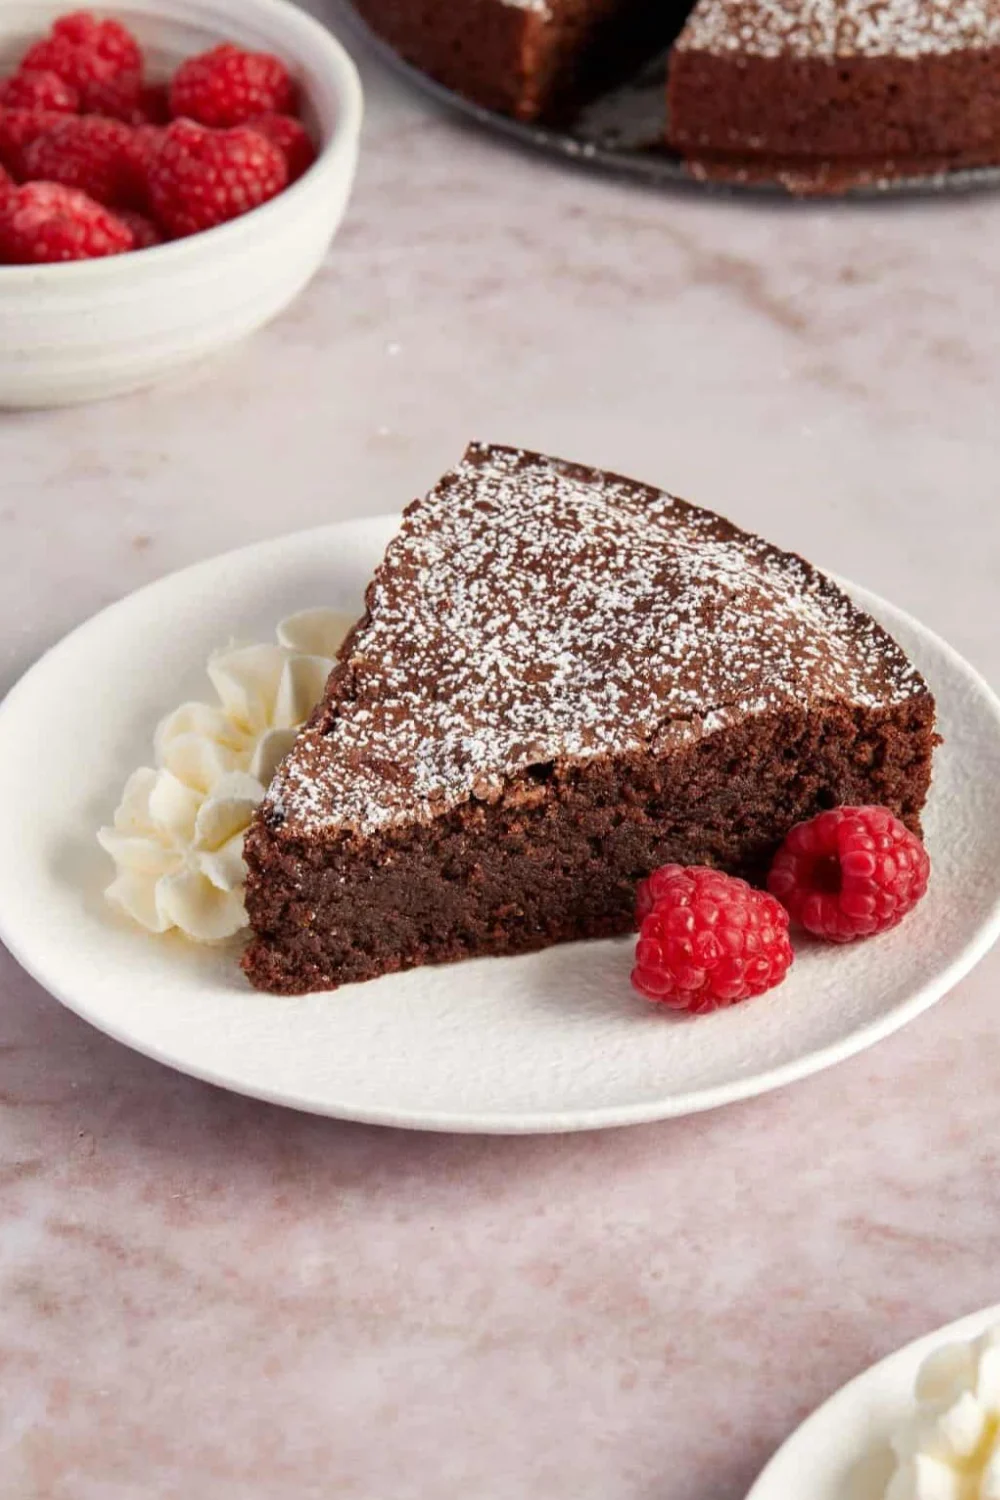
Serving Ideas That Make It Extra Special
For me, chocolate lava cake is already perfect on its own, but adding a few simple touches can take it to another level.
I love serving it with:
- A scoop of vanilla ice cream for contrast
- Fresh strawberries or raspberries
- A light dusting of powdered sugar
- A drizzle of chocolate or caramel sauce
The combination of warm cake and cold ice cream is something I always come back to. It’s simple, yet incredibly satisfying.
Common Mistakes (And How I Avoid Them)
Over time, I’ve made a few mistakes that taught me valuable lessons.
- Overbaking: The most common issue. I now always set a timer and check early.
- Skipping ramekin prep: This can cause the cake to stick and break.
- Using low quality chocolate: It affects both texture and taste.
- Incorrect measurements: Baking is precise, so accuracy matters.
Avoiding these mistakes makes a huge difference in the final result.
Make Ahead Tips for Convenience
One thing I love about this recipe is how flexible it is.
If I’m planning a dinner or event, I prepare the batter in advance and pour it into ramekins. Then I refrigerate them until I’m ready to bake.
When needed, I simply bring them slightly to room temperature and bake as usual.
This makes hosting so much easier and stress-free.
Storage and Reheating
Chocolate lava cake is best enjoyed fresh, but if you do have leftovers:
- Store them in the fridge for up to 2 days
- Reheat in the microwave for 20 30 seconds
Just keep in mind that the molten center may not be as gooey after reheating, but it will still taste delicious.
Why I Keep Coming Back to This Recipe
There are so many desserts out there, but chocolate lava cake holds a special place for me. It’s quick, reliable, and always delivers that special moment when you serve it.
Whether I’m making it for a celebration or just a personal treat, it never fails to impress. It’s one of those recipes that feels like a small luxury simple to make, yet incredibly rewarding.And honestly, once you master it, you’ll always have a go to dessert that feels both comforting and elegant.
Final Thoughts
If you’re looking for a dessert that feels thoughtful, indulgent, and memorable, chocolate lava cake is always the right choice. It brings warmth, richness, and a touch of elegance to any moment.
For me, it’s not just about the taste it’s about the feeling it creates. That first spoonful, the melted center, and the smiles it brings to the table make it truly special.
So whether you’re planning something romantic, celebrating with loved ones, or simply craving chocolate, this recipe is one you’ll want to keep close.Trust me, once you try it, it will become a favourite in your kitchen too.
Frequently Asked Questions
Chocolate Lava Cake
This chocolate lava cake is rich, soft, and filled with a perfectly molten center. It comes together quickly with simple ingredients but delivers a bakery style dessert. Perfect for special moments or whenever you crave something indulgent.
Ingredients
100 g dark chocolate
100 g unsalted butter
2 whole eggs
2 egg yolks
1/4 cup (50 g) sugar
2 tbsp all purpose flour
1 tsp vanilla extract
Pinch of salt
Butter & cocoa powder (for greasing)
Directions
- Preheat oven to 200°C (390°F) and grease ramekins with butter, then dust with cocoa powder.
- Melt chocolate and butter together until smooth.
- Whisk eggs, egg yolks, and sugar until slightly thick and pale.
- Combine melted chocolate with egg mixture, add vanilla and salt.
- Gently fold in flour until just combined.
- Pour batter into ramekins (3/4 full).
- Bake for 10 to12 minutes until edges are set and center is soft.
- Let rest for 1 minute, then invert and serve immediately.
Recipe Video
Notes
- Bake Just Until Edges Are Firm: Bake only until the edges are set while the center stays slightly soft to achieve a perfect molten texture.
Use Good Quality Chocolate: Using high quality chocolate enhances the flavour, making the cake richer, smoother, and more delicious.
Do Not Overmix the Batter: Mix the batter just until combined to keep the cake light, soft, and tender.